

Tent stitch is defined as a diagonal stitch that crosses a single canvas intersection at a 45-degree angle, forming the foundation of nearly every needlepoint project. It comes in three main variations: Half Cross, Continental, and Basketweave. Each variation produces an identical front appearance but differs significantly in durability, thread use, and how much it distorts the canvas. Understanding these differences is the key to choosing the right technique for your project, whether you are stitching a small ornament or a large decorative pillow.
What is a tent stitch in needlepoint, and why does it matter?
The tent stitch is the single most important stitch in needlepoint. Every beginner starts here, and most experienced stitchers return to it again and again. Needlepoint itself uses a painted or printed canvas that works like a paint-by-number guide, which makes it more forgiving than cross stitch worked from a chart on blank fabric. The tent stitch fills in those canvas sections one diagonal stitch at a time.
What makes the tent stitch so useful is its simplicity. You move your needle diagonally over one canvas intersection, pull the thread through, and repeat. That single motion, done consistently across a canvas, creates a smooth, even surface that holds color beautifully. The main hurdle for beginners is not the stitch itself but learning which of the three variations to use and when.
What are the three main tent stitch variations and how do they differ?
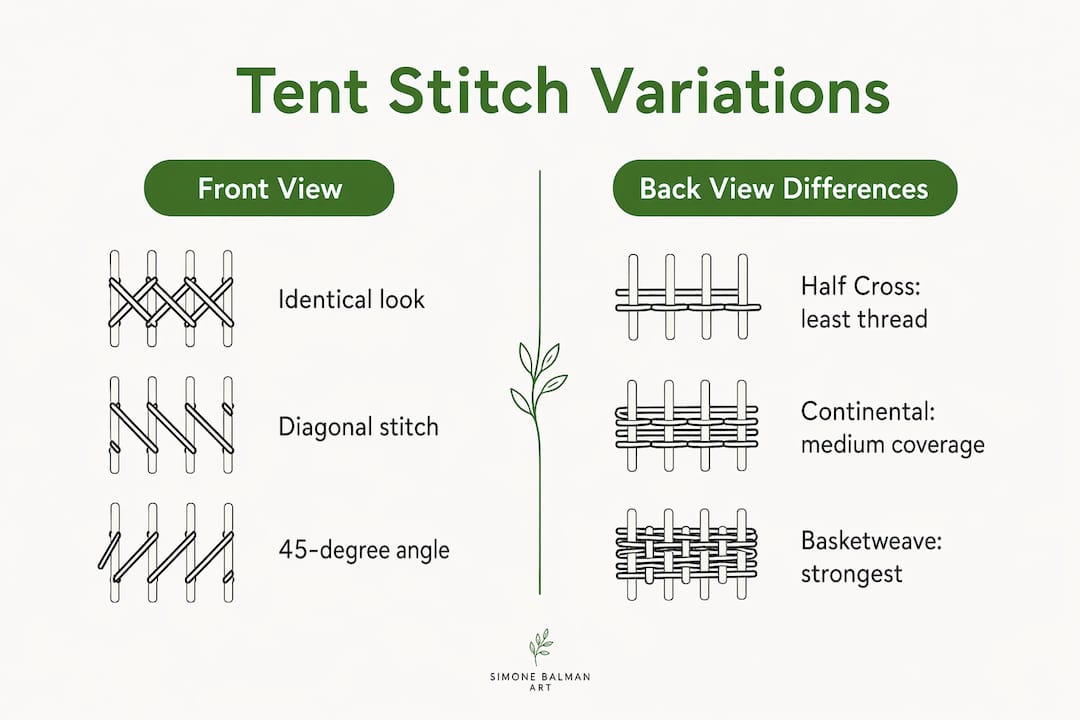
All three tent stitch variations look the same from the front. The real differences show up on the back of the canvas and in how each one handles thread and tension.
Half Cross stitch
The Half Cross stitch is the fastest of the three. It uses the least thread because the needle travels straight across the back of the canvas rather than diagonally. That speed comes at a cost. Half Cross is the least durable variation and is most likely to distort the canvas over time. Use it for decorative pieces that will not face heavy wear, like framed artwork or ornaments.
Continental stitch
The Continental stitch travels diagonally on the back of the canvas, which adds more thread coverage and medium durability. It is a solid all-purpose choice and works especially well for outlining shapes and stitching borders. It uses more thread than Half Cross but less than Basketweave. Canvas distortion is possible with Continental if you stitch large areas without a frame.
Basketweave stitch
The Basketweave stitch is the strongest of the three. Its woven back structure distributes tension diagonally across the canvas, which prevents distortion and creates the flattest, most durable finished piece. It uses the most thread, so plan your supplies accordingly. Basketweave is the go-to choice for filling large background areas on any project that will see regular use, such as pillows or bags.
Here is a quick comparison to help you choose:
| Variation | Durability | Thread use | Best for |
|---|---|---|---|
| Half Cross | Low | Least | Framed art, ornaments |
| Continental | Medium | Moderate | Borders, detail areas |
| Basketweave | High | Most | Large fills, functional items |
Pro Tip: Use Continental for small detail areas and Basketweave for large background fills on the same project. Mixing the two gives you efficiency and durability where each matters most.
How to do a tent stitch: tools, materials, and technique
Getting started with tent stitch needlepoint requires only a handful of supplies. You do not need much to begin, and the learning curve is gentle.
What you need
Canvas: A 13-mesh canvas is ideal for beginners. 13-mesh squares are larger and easier to see, which makes learning the stitch movement much simpler. Move to 18-mesh once you feel comfortable.
Tapestry needle: A blunt-tipped tapestry needle glides through canvas holes without splitting threads. Check out this guide on selecting the right needle to match needle size to your canvas mesh count.
Thread: Wool yarn, Persian wool, or cotton embroidery floss all work well. The thread should fill the canvas holes without bunching.
Small scissors: Sharp, pointed scissors make clean cuts close to the canvas.
Frame or stretcher bars: Optional but recommended, especially for larger pieces.
Step-by-step tent stitch instructions
Thread your needle and bring it up through the canvas at your starting hole (call it hole A).
Push the needle down diagonally one intersection to the upper right (hole B). That diagonal line is your tent stitch.
Bring the needle back up through the hole directly below hole A (hole C).
Push the needle down diagonally again to the upper right, one intersection above hole C.
Continue this motion across the row, keeping your tension even and consistent.
At the end of a row, turn your work or reverse direction depending on your chosen variation.
Pro Tip: Secure your starting thread by weaving it under the first few stitches on the back of the canvas instead of tying a knot. Knots create lumps and can loosen over time.
Tension is the detail most beginners overlook. Pull each stitch firmly enough to lie flat against the canvas, but not so tight that the canvas puckers. A consistent, relaxed pull produces the smoothest results.
Common challenges beginners face and how to overcome them
Every beginner runs into a few predictable problems. Knowing what to expect makes them much easier to handle.
Canvas distortion is the most common issue. Basketweave reduces distortion better than the other variations because it distributes tension in alternating diagonal directions. Using a frame or stretcher bars keeps the canvas taut and prevents warping during stitching, especially on larger pieces.
Running out of thread mid-project (sometimes called “thread chicken”) is a real frustration. Thread usage varies significantly between variations: Half Cross uses the least, Continental uses more, and Basketweave uses the most. Estimate generously when buying thread, and practice on a small scrap of canvas first to get a feel for how much each variation consumes.
Here are a few practical strategies to keep your project on track:
Use Basketweave for large background fills and Continental for borders to balance thread consumption.
Buy extra thread in your main background color. Running short on a background color mid-project is far more disruptive than having leftovers.
Keep your stitching frame or stretcher bars in place throughout the project, not just at the start.
Work in good lighting. Missed holes are hard to spot on a busy canvas until you have stitched several rows past them.
Pro Tip: Before starting any new project, stitch a 2-inch test square on scrap canvas. This lets you check your tension, confirm your thread coverage, and get comfortable with the stitch rhythm before committing to the real piece.
One thing worth remembering: slight variations in hand tension from stitch to stitch are completely normal. Rhythm and flow create attractive needlepoint pieces far more reliably than rigid mechanical precision. Embrace the natural quality of hand stitching.
What projects work best with tent stitch?
The tent stitch adapts to almost any needlepoint project. Its clean, diagonal surface holds color evenly and creates a polished finish that works for both decorative and functional items.
Here are some great starting points for beginners:
Ornaments: Small, quick, and satisfying. A 3-inch ornament on 13-mesh canvas can be completed in a few evenings and makes a wonderful personal gift.
Eyeglass cases and small bags: These benefit from Basketweave’s durability since they handle daily use. They are also small enough to finish without a huge time commitment.
Throw pillows: A classic needlepoint project. Large background areas are perfect for Basketweave, while any detailed motif in the center suits Continental.
Bookmarks and key fobs: Ideal for practicing the stitch on a narrow canvas strip. Great for quick gift projects that do not require weeks of work.
Wall art and framed pieces: Half Cross works perfectly here since durability is not a concern. These pieces let you focus on color and design without worrying about wear.
Your stitch choice directly affects the final outcome. A pillow stitched entirely in Half Cross will feel thinner and may distort over time. The same design stitched in Basketweave will feel substantial, lie flat, and hold its shape for years. Needlepoint projects range widely from small accessories to large home decor pieces, and the tent stitch handles all of them well.
For help choosing the right canvas size for your project, the fabric size calculator at Simone Balman Art is a useful starting point.
Key takeaways
The tent stitch is the foundation of needlepoint, and choosing between Half Cross, Continental, and Basketweave determines your project’s durability, thread use, and canvas stability.
| Point | Details |
|---|---|
| Three variations, one look | Half Cross, Continental, and Basketweave look identical from the front but differ in durability and thread use. |
| Basketweave for durability | Use Basketweave for large fills and functional items; its woven back prevents canvas distortion. |
| Canvas choice matters | 13-mesh canvas is easiest for beginners; larger holes make the stitch movement clear and manageable. |
| Manage your thread | Buy extra background thread; Basketweave uses significantly more than Half Cross or Continental. |
| Practice first | A small test square on scrap canvas builds rhythm and confidence before you start the real project. |
Why the tent stitch clicked for me after I stopped chasing perfection
When I first learned the tent stitch, I spent too much energy trying to make every single stitch look identical. I would pull each one the same way, count the tension, and still feel like my work looked uneven. The shift happened when I stopped treating it like a mechanical task and started treating it like a rhythm.
Needlepoint is a slow, meditative craft. There is no single right way to approach the tent stitch, and the slight natural variations that come from stitching by hand are part of what makes a finished piece feel warm and personal. A machine can produce perfect uniformity. Your hands produce something better.
My honest advice: start with a small project on 13-mesh canvas, use the Continental stitch for your first few rows to get the diagonal movement into your muscle memory, then switch to Basketweave for any large areas. You will feel the difference in how the canvas behaves almost immediately. And when you finish that first piece, even if it is just a small ornament, the satisfaction is real.
The tent stitch is genuinely accessible. You do not need years of experience or expensive supplies. You need a canvas, a needle, some thread, and the willingness to enjoy the process stitch by stitch.
— Simone
Simone Balman Art has tools to support your stitching
Getting the practical side of a project right makes the creative side much more enjoyable. Simone Balman Art offers a set of free tools built specifically for stitchers, including a fabric size calculator that helps you figure out exactly how much canvas you need before you buy anything.
The site also offers a growing collection of modern digital PDF patterns and printed pattern books covering flowers, animals, travel destinations, seasonal designs, and more. Every pattern is designed with clear charts and a focus on an enjoyable stitching experience. Whether you are planning your first tent stitch project or looking for your next design, Simone Balman Art has resources to help you stitch with confidence.
FAQ
What is a tent stitch in needlepoint?
A tent stitch is a diagonal stitch that crosses a single canvas intersection at a 45-degree angle. It is the foundational stitch of needlepoint and comes in three variations: Half Cross, Continental, and Basketweave.
What is the difference between tent stitch and cross stitch?
Needlepoint uses a painted canvas and the tent stitch to fill color areas, while cross stitch uses blank Aida fabric and a chart to form X-shaped stitches. The two crafts use different fabrics, tools, and stitch structures.
Which tent stitch variation is best for beginners?
Continental is the best starting point for beginners. It is more durable than Half Cross, easier to learn than Basketweave, and works well for both small areas and practice pieces.
How do I prevent canvas distortion when stitching?
Use Basketweave stitch for large areas and mount your canvas on stretcher bars or a scroll frame to keep tension even. Basketweave distributes tension diagonally, which keeps the canvas flat throughout the project.
Can I mix tent stitch variations in one project?
Yes, and it is actually recommended. Use Continental for borders and detailed areas, and Basketweave for large background fills. Mixing variations balances thread consumption and gives your finished piece the best combination of detail and durability.


