

A seascape stitch design is a layered textile artwork that recreates coastal scenes using embroidery, fabric collage, and three-dimensional embellishments like shells and driftwood. Often called a “stitchscape,” this style combines techniques such as stumpwork, couching, French knots, and bullion knots to build up texture and depth on fabric. The result looks less like a flat pattern and more like a small, tactile window onto the ocean. If you’ve been curious about seascape embroidery techniques and whether they’re right for your next project, this guide walks you through everything you need to know, from materials to stitches to the creative process itself.
What is a seascape stitch design and how does it work?
A seascape stitch design is defined as a layered textile artwork that mimics coastal elements through embroidery, fabric collage, and 3D embellishments. Unlike traditional counted cross stitch, which follows a grid, seascape stitching is more freeform and expressive. You build up layers of fabric and thread to suggest sand, water, rocks, and sky rather than plotting each stitch on a chart.
The term “stitchscape” is widely used by textile artists to describe this evolving, landscape-style approach. The design grows as you work, responding to the fabrics and textures you have on hand. That organic quality is exactly what makes seascape needlework patterns so appealing to crafters who enjoy creative freedom alongside technical skill.
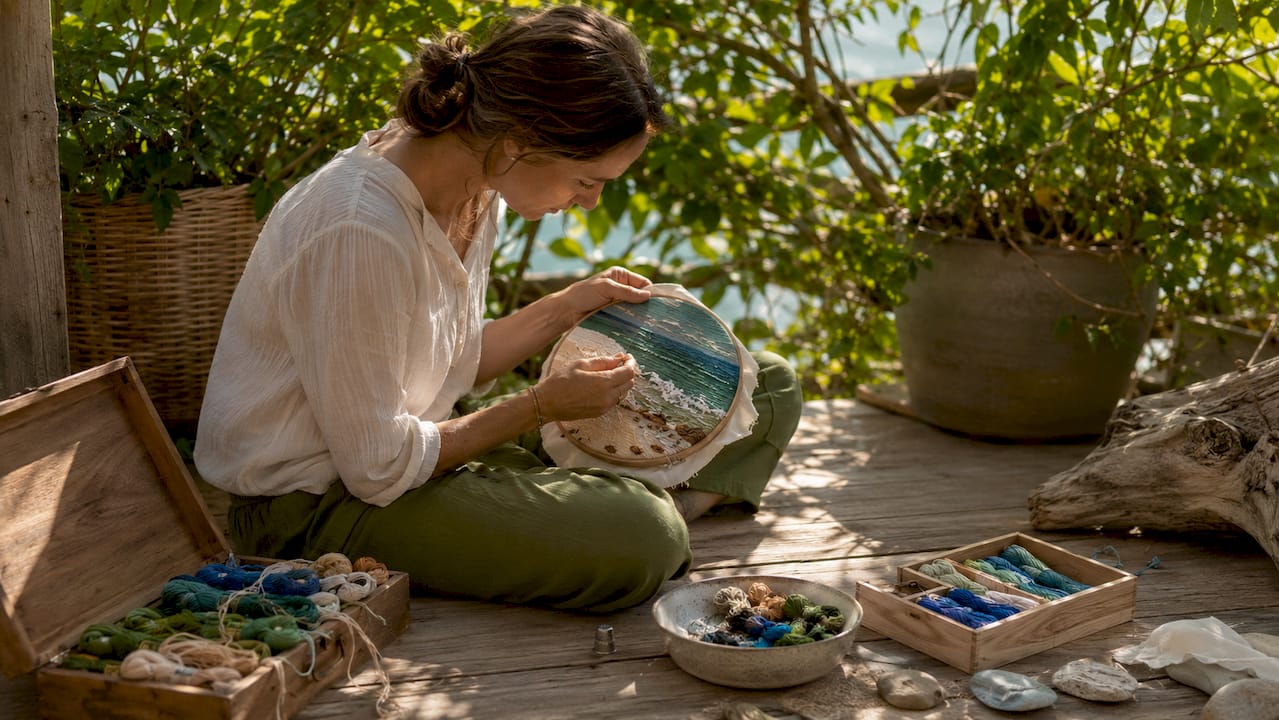
Stumpwork plays a central role in giving these pieces their signature raised, three-dimensional look. Couching secures heavier threads or natural fibers to the fabric surface without pulling them through. French knots and seed stitches scatter across the surface to suggest sea foam, pebbles, or sandy textures. Together, these techniques produce a piece that feels alive and tactile in a way flat embroidery simply cannot.
What materials and tools do you need?
The right materials make seascape stitching much more enjoyable. You don’t need expensive supplies to get started. Many stitchers work with reused fabrics and scraps, which keeps costs low and adds character to the finished piece.
Here’s a practical list of what to gather before you begin:
- Fabric base: A firm, tightly woven fabric like cotton or linen works well as your background. Hand-dyed or coastal-colored scraps in blues, greens, sandy beiges, and grays add instant atmosphere.
- Embroidery hoop: A 4-inch hoop is a good starting size for a small seascape project. It keeps your fabric taut and your stitches even.
- Embroidery floss: Choose a range of blues, greens, whites, and earth tones. Varying thread weights adds visual interest.
- Needles: A standard embroidery needle works for most stitches. A tapestry needle is useful for whip stitch and couching.
- Batting or felt: Small pieces are used for stumpwork padding beneath raised areas.
- Found objects: Cleaned shells, small pieces of driftwood, sea glass, and beads add wonderful texture and authenticity.
- Scissors, pins, and fabric glue: These help you position fabric layers and embellishments before stitching them down.
Choosing the right cross stitch fabric for your base layer is worth thinking through carefully, since fabric count and weave affect how your stitches sit and how much detail you can achieve.
Pro Tip: Before adding shells or driftwood to your piece, clean them thoroughly and seal them with a thin coat of clear craft varnish. This prevents moisture damage and stops any salt residue from weakening your threads over time.
Which stitches and techniques bring seascapes to life?
Seascape embroidery techniques rely on a wide mix of stitches, each contributing a different texture or visual effect. Many seascape designs use bullion knots, stem stitch, seed stitch, couching, satin stitch, running stitch, whip stitch, French knots, and beading together in one piece. That variety is what gives the finished work its richness and dimensionality.
The table below shows the most common stitches, what they look like, and where they typically appear in a seascape design:
| Stitch | Visual effect | Typical use in seascapes |
|---|---|---|
| French knot | Small, rounded bump | Sea foam, pebbles, sand texture |
| Bullion knot | Elongated coil | Seaweed, coral, wave crests |
| Seed stitch | Scattered short marks | Sandy areas, water shimmer |
| Back stitch | Clean, defined line | Horizon lines, rock outlines |
| Whip stitch | Textured, looped edge | Fabric collage borders, wave edges |
| Couching | Raised, secured cord | Securing heavy threads or natural fibers |
| Satin stitch | Smooth, filled area | Sky, calm water, flat sand |
Stumpwork is the technique that adds genuine three-dimensional height to a piece. Stumpwork requires varied padding and stitch tension to create natural, organic textures. Uniform padding produces a flat, synthetic look, while irregular layering adds the organic movement that makes a seascape feel real.
Thread weight matters just as much as stitch choice. Using thicker 2-strand thread for running stitches and lighter contrast thread for whip stitch mimics the dancing light on wave patterns. Layered stitches of varied weights add visual depth and shimmer that a single thread weight cannot achieve.
Pro Tip: When combining thread painting with stumpwork, work your color transitions gradually. Moving from deep navy through teal to pale aqua replicates ocean depth far more convincingly than jumping between two colors.
How does a seascape stitch design come together creatively?
The creative process behind seascape stitching is less rigid than most embroidery styles. Many seascape stitchers prefer an exploratory approach, letting fabric textures and found objects guide the composition rather than following a fully pre-planned design. This is a genuine shift in mindset if you’re used to working from a counted chart.
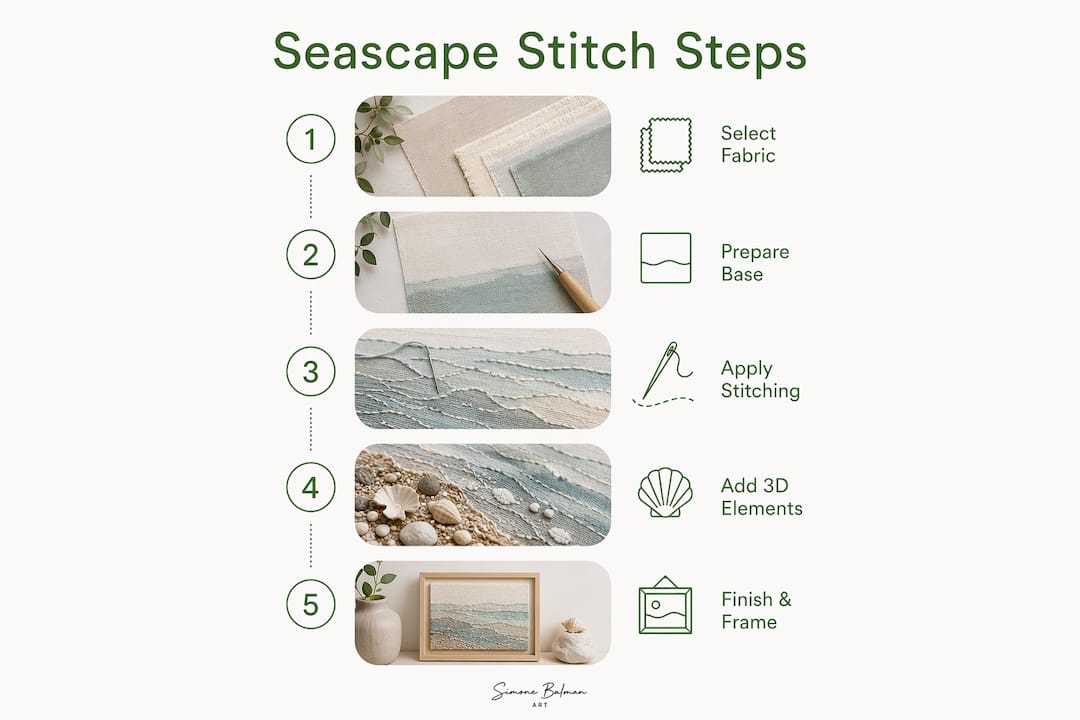
A typical seascape project evolves through these stages:
- Gather your materials first. Lay out your fabric scraps, threads, and found objects before you start. The colors and textures you have available will shape the design naturally.
- Build your background layers. Tear or cut fabric into organic shapes and layer them to suggest sky, water, and sand. Pin or lightly glue them in place before stitching.
- Secure focal embellishments early. Secure larger focal elements like shells before stitching backgrounds to avoid damaging embroidery and losing visual balance. Stitch or couch them down firmly, then build fabric layers around them.
- Add stitching from background to foreground. Work your sky and distant water first, then move forward to rocks, waves, and sand. This layering creates natural depth.
- Fill and embellish last. Scatter French knots, seed stitches, and beads across the surface to add final texture and sparkle.
The key insight here is that the design is never fully finished in your head before you begin. You respond to what the piece is telling you as it grows. That responsiveness is what gives seascape stitchscapes their lively, natural quality.
Practical tips for stitching your own seascape designs
Starting your first seascape embroidery project feels much less daunting when you have a clear approach. The biggest mistake beginners make is trying to keep everything too neat and controlled.
Textile artists caution against overly neat seascapes, encouraging you to embrace wild, flowing, overlapping layers to capture coastal movement authentically. Intentional irregularity conveys natural coastal textures better than perfect symmetry. Give yourself permission to let threads tangle slightly and fabric edges fray a little.
Here are some ideas to spark your creativity and keep your project moving:
- Motif ideas: Crashing waves, tidal rock pools, sandy beaches, sea caves, lighthouse silhouettes, kelp forests, and coastal cliffs all translate beautifully into stitchscape form.
- Color palettes: Try stormy grays and dark teals for a dramatic mood, or warm sandy yellows and pale aquas for a sunlit beach feel.
- Texture layering: Combine smooth satin stitch areas with rough seed stitch clusters to contrast calm water with churning surf.
- Scale variety: Mix fine single-strand details with chunky couched cords to create a sense of distance and foreground interest.
- Found object integration: Couch shells and driftwood down with strong thread rather than glue alone. Glue can fail over time, especially on pieces that will be handled or displayed in humid rooms.
A coastal-themed pattern can also serve as a helpful reference point when you’re building your first seascape composition, giving you a sense of color placement and proportion before you go fully freeform.
Pro Tip: Work your stitching sequence from lightest to darkest thread colors in each zone. This prevents darker threads from visually bleeding into lighter areas and keeps your water and sky zones reading clearly from a distance.
Key Takeaways
A seascape stitch design is defined by layered fabrics, mixed embroidery techniques, and three-dimensional embellishments that work together to recreate the texture and mood of a coastal scene.
| Point | Details |
|---|---|
| Core definition | A seascape stitch design layers fabric collage, embroidery, and 3D objects to mimic coastal scenes. |
| Stitch variety matters | Using bullion knots, French knots, seed stitch, and couching together creates richness and depth. |
| Stumpwork adds dimension | Irregular padding and varied stitch tension produce organic, raised textures that flat stitching cannot. |
| Secure focal objects first | Attach shells and driftwood before stitching backgrounds to protect the design and maintain balance. |
| Embrace organic chaos | Intentionally irregular, overlapping layers capture coastal movement better than neat, uniform stitching. |
Why seascape stitching taught me to trust the process
I’ll be honest: the first time I tried a stitchscape-style piece, I kept reaching for a chart that didn’t exist. I wanted a plan, a grid, a clear path from start to finish. Seascape stitching doesn’t work that way, and that was the whole point.
What I’ve found is that the most evocative pieces come from responding to what’s already in front of you. A scrap of hand-dyed fabric in exactly the right shade of storm gray, a shell picked up on a walk, a length of chunky linen thread that catches the light just so. These things shape the design in ways no pre-planned chart ever could.
The meditative quality of this kind of stitching is real. Working slowly through layers of texture, building up a scene stitch by stitch, is genuinely calming in a way that counted work sometimes isn’t. There’s no counting, no checking, no fear of being one square off. There’s just the fabric, the thread, and the image forming under your hands.
My honest advice: start small. A 4-inch hoop is plenty for your first seascape. Gather a handful of blue and green scraps, a few shells, and some floss in ocean tones. Then let the piece tell you what it wants to be. You’ll be surprised how quickly it starts to look like the sea.
— Simone
Seascape patterns and tools from Simone Balman Art
If seascape stitching has caught your interest, Simone Balman Art has resources to help you plan and start your next coastal project with confidence.
The free fabric size calculator and pattern size calculator take the guesswork out of sizing your project before you cut a single piece of fabric. For coastal inspiration, the ocean wave pattern and the baby sea animals bundle offer beautiful ocean-themed designs with clear, well-charted artwork. Whether you’re planning a full stitchscape or a smaller coastal piece, you’ll find patterns and tools at Simone Balman Art to support every step of the process.
FAQ
What is a seascape stitch design in simple terms?
A seascape stitch design is a layered textile artwork that uses embroidery stitches, fabric collage, and three-dimensional embellishments like shells to recreate coastal scenes. It is also called a stitchscape and combines techniques such as stumpwork, French knots, and couching.
What stitches are used in seascape embroidery?
Seascape embroidery commonly uses French knots, bullion knots, seed stitch, back stitch, satin stitch, whip stitch, couching, and running stitch. Using a variety of these stitches together creates the texture and depth that makes seascape designs feel dimensional.
Do I need to plan a seascape design before I start stitching?
Many experienced seascape stitchers prefer an exploratory approach, letting fabric textures and found objects guide the composition as the piece evolves. A rough layout of fabric layers is helpful, but a fully detailed plan is not required.
Can beginners try seascape stitch designs?
Yes. Starting with a small 4-inch hoop, a few fabric scraps in ocean colors, and basic stitches like seed stitch and French knots is a practical entry point. Workshops teaching slow stitching show that seascape projects are adaptable from small wearable art to larger framed pieces.
How do you attach shells and driftwood to embroidery?
Secure shells and driftwood with strong thread by couching or stitching them down before adding background fabric layers. Attaching focal objects first protects the surrounding embroidery and keeps the overall design balanced.


