

Rice stitch embroidery is a compound decorative stitch built in two layers: first, a large cross stitch forms the foundation, then small diagonal stitches cross each corner of that base cross to create four tiny secondary crosses. The result is a slightly raised, evenly textured surface that fills areas beautifully without looking flat or busy. You may also see it called “crossed corners” or the “William and Mary stitch,” and it belongs firmly to the cross stitch family.
Here is a quick overview of what makes rice stitch unique:
- Structure: A large cross stitch base with diagonal stitches crossing all four corners
- Appearance: Slightly raised, pebbled texture with an even, geometric look
- Fabric: Works on canvas, linen, Aida, and evenweave
- Thread: Can use one thread throughout or two different weights or colors for added depth
- Not the same as seed stitch: Seed stitch uses scattered, random short straight stitches rather than a structured compound form
- Stitch size: Adjustable by working over an even number of fabric threads
Table of Contents
- How to do the rice stitch: a step-by-step tutorial
- Where rice stitch really shines: common uses and projects
- How rice stitch compares to similar embroidery stitches
- Expert insights on rice stitch technique and artisan heritage
- The history and origin of rice stitch embroidery
- Ready to stitch? Explore more at Simone Balman Art
- Key Takeaways
- FAQ
How to do the rice stitch: a step-by-step tutorial
What you need
- A blunt tapestry needle (size 22–26 for canvas, finer for linen)
- Evenweave fabric, Aida, or canvas
- Stranded cotton, wool, or pearl cotton thread
- A small embroidery hoop or frame to keep tension even
Step-by-step instructions
- Start your foundation cross. Bring the needle up at the bottom left corner of a square of fabric threads with an even count. Take it down at the top right corner to lay the first diagonal.
- Complete the base cross. Come up at the bottom right corner and go down at the top left, crossing over the first stitch. Keep the top thread always running from bottom left to top right for a uniform look across the whole piece.
- Work the top left corner. Bring the needle up just outside the top left corner of the base cross, then take it down two thread intersections diagonally inward, crossing that corner.
- Repeat at each corner. Work the top right, bottom right, and bottom left corners in the same way. Each small diagonal stitch should meet at the midpoint of the foundation cross’s sides, forming four neat mini crosses.
- Build in rows. Repeat the full rice stitch block horizontally, then move to the next row. Keeping your rows consistent gives the finished area that satisfying, even texture.
- Finish off cleanly. Secure thread ends on the back with a small anchoring stitch rather than a knot, which can create lumps under the raised surface.
Common mistake to avoid: Over-tightening the diagonal corner stitches collapses the texture and flattens the raised, pebbled effect you are working toward. Pull each stitch snugly but gently.
Pro Tip: Try using a slightly thicker or contrasting thread for the corner diagonal stitches. The two-layer color effect adds real visual depth without any extra complexity.
Where rice stitch really shines: common uses and projects
Rice stitch is genuinely versatile, and once you learn it, you will spot opportunities for it everywhere in your needlework. It works particularly well as a background fill stitch, covering large areas with texture that feels lively rather than monotonous.
Popular projects and applications include:
- Background fills in canvaswork and needlepoint, where its texture contrasts beautifully with smooth tent stitch areas
- Geometric samplers, especially designs inspired by 18th-century Scottish embroidery traditions
- Heirloom pieces and decorative panels where a heritage, artisanal quality is the goal
- Textured motifs within larger compositions, such as filling the body with a flower or an animal
- Java canvaswork pieces, where rice stitch was historically one of the core stitches
- Mixed-stitch designs on linen or Aida, where the raised texture adds dimension alongside flatter stitches
You can also use rice stitch as a single isolated motif rather than a repeating fill, which gives it a star-like or geometric accent quality. Explore cross stitch ornament examples to see how textured stitches like this one bring heirloom designs to life.
How rice stitch compares to similar embroidery stitches
Understanding where rice stitch sits among related embroidery stitch types helps you choose the right technique for your project.
| Feature | Rice stitch | Seed stitch | Alpine stitch |
|---|---|---|---|
| Stitch structure | Compound: large cross plus four corner diagonals | Random short straight stitches scattered across fabric | Crochet-based: front post and double crochet stitches |
| Appearance | Raised, geometric, even texture | Soft, organic, irregular texture | Ridged, woven-looking surface |
| Common uses | Background fills, geometric canvaswork, samplers | Shading, soft texture fills in surface embroidery | Crochet fabric texture, not traditional embroidery |
| Fabric compatibility | Canvas, linen, Aida, evenweave | Any embroidery fabric | Yarn and crochet fabric only |
| Thread options | Two colors or weights for layered effect | Single thread typical | Yarn |
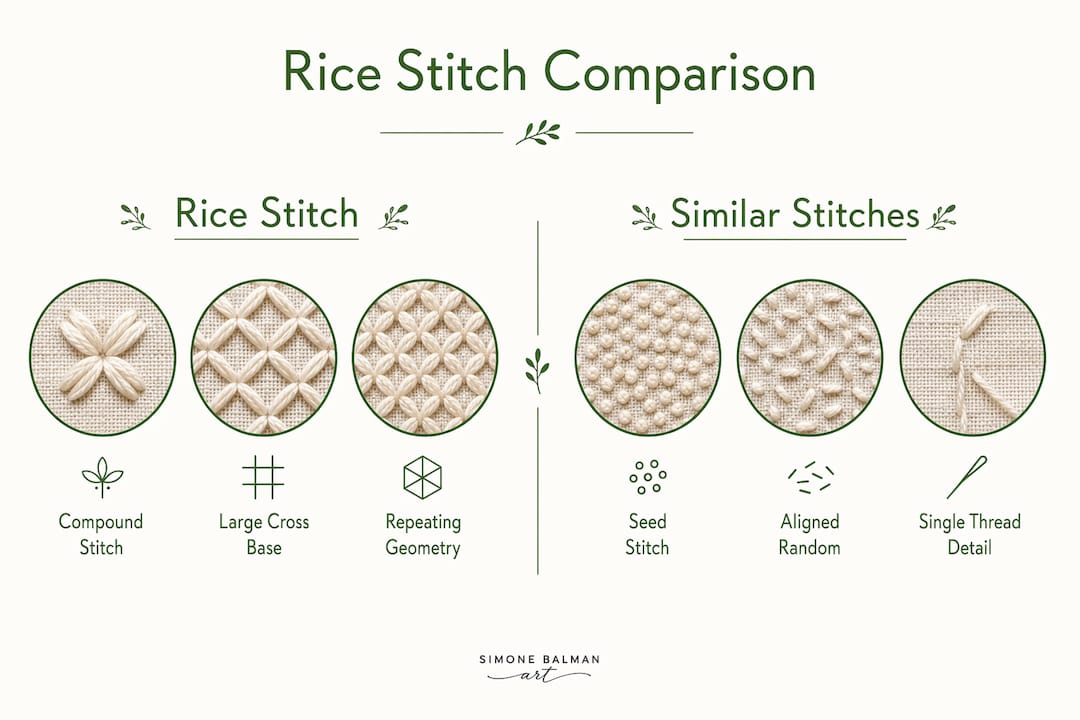
The key distinction is structure. Rice stitch is a structured compound stitch with a predictable, repeating geometry, while seed stitch is intentionally irregular. Alpine stitch belongs to crochet rather than needle embroidery, so the comparison is mostly about clearing up naming confusion rather than technique overlap. If you want a textured fill that looks deliberate and geometric, rice stitch is your choice. If you want something that mimics a soft, scattered look, seed stitch fits better.
Expert insights on rice stitch technique and artisan heritage
Rice stitch rewards careful attention to two things above all: thread direction and tension. Consistent stitch direction for the foundation cross is what gives a filled area its uniform sheen. When the top thread of every base cross runs the same way, light catches the surface evenly and the texture reads as intentional rather than accidental.
Adjusting scale is another way to get more from this stitch. Working over two fabric threads produces a fine, dense texture suited to detailed work, while working over four or six threads creates a bolder, more graphic effect. Varying thread weight and color between the foundation and corner stitches opens up a whole range of visual possibilities, from subtle tonal shifts to bold two-color geometric patterns.
At Simone Balman Art, the joy of stitching comes from understanding techniques deeply enough to make them your own. Rice stitch is a perfect example: simple to learn, endlessly adaptable, and deeply satisfying to work.
Pro Tip: If your corner stitches keep pulling the foundation cross out of shape, try holding the base cross lightly with your non-dominant thumb as you work each diagonal. It keeps everything in place while the stitch sets.
The history and origin of rice stitch embroidery
Rice stitch has a genuinely interesting past. It was prominent in Scotland during the second half of the 18th century, where embroiderers used it in graduating shades to create geometric designs with a rich, dimensional quality. Those Scottish pieces often combined rice stitch with other canvaswork stitches, using the texture contrast to define shapes and add visual movement.
The stitch also played a central role in Java canvaswork, a style named for the origin of the fabric rather than the technique itself. This tradition used rice stitch as one of its core stitches, and surviving examples show how effectively the compound structure fills large areas while maintaining visual interest.
Rice stitch experienced a revival in the late 19th century, when interest in traditional needlework techniques resurged across Britain and America. The cross stitch family to which it belongs has roots stretching back to the earliest textile traditions across many cultures, and rice stitch represents one of the more refined developments within that lineage. Today, crafters working on heirloom samplers or heritage-inspired embroidered pieces reach for rice stitch precisely because of that historical weight.
Ready to stitch? Explore more at Simone Balman Art

Rice stitch pairs beautifully with the kinds of detailed, charted designs that Simone Balman Art specializes in. Whether you are planning a geometric sampler or adding texture to a larger needlework project, the cross stitch pattern collection at Simone Balman Art gives you a strong creative foundation. Use the free fabric size calculator to plan your next project with confidence before you pick up your needle.
Key Takeaways
Rice stitch is a compound cross stitch family technique that builds a raised, geometric texture by layering diagonal corner stitches over a large foundation cross.
| Point | Details |
|---|---|
| Two-phase construction | Work a large base cross first, then add diagonal stitches at each corner to complete the stitch. |
| Consistent thread direction | Always run the top foundation thread from bottom left to top right for a uniform surface. |
| Tension matters | Pull corner stitches gently; over-tightening collapses the raised, pebbled texture. |
| Versatile scale | Work over 2, 4, or 6 fabric threads to adjust stitch size for fine or bold effects. |
| Two-color option | Using different thread weights or colors for foundation and corner stitches adds depth and visual interest. |
FAQ
How do you do the rice stitch?
Work a large cross stitch over an even number of fabric threads, keeping the top thread direction consistent, then add a small diagonal stitch across each corner of that base cross so the four corners meet at the midpoints of the sides.
What are the main types of embroidery stitches?
Embroidery stitches are grouped into families by technique, including the cross stitch family, running stitch family, satin stitch family, chain stitch family, and knot family, among others. Rice stitch belongs to the cross stitch family.
Which stitch is called the queen of embroidery?
The satin stitch is widely regarded as the queen of embroidery stitches, prized for its smooth, lustrous surface and the skill required to keep its edges clean and even.
What is the difference between rice stitch and alpine stitch?
Rice stitch is a needle embroidery technique using a compound cross stitch structure on fabric, while alpine stitch is a crochet technique involving front post and double crochet stitches worked in yarn. The two are unrelated beyond a surface similarity in their textured appearance.


