

Cross stitch finishing techniques are specialized methods used to enhance the presentation, preservation, and personalization of completed embroidery projects. Whether you’ve just finished your first floral design or you’re working through an advanced piece, knowing your cross stitch finishing techniques list separates a beautiful result from a truly lasting one. The right finish protects your stitching, adds visual polish, and reflects your personal style. From lacing and acid-free backing to dimensional ornaments and hoop displays, each method serves a specific purpose.
1. The cross stitch finishing techniques list: lacing for professional mounting
Lacing is the gold standard for long-term mounting, offering stable, distortion-free support that no adhesive can match. The technique works by threading strong linen or embroidery floss across the back of an acid-free board, pulling the fabric taut without stretching or warping the stitches. Experts recommend starting with 18–24 inch thread lengths and leaving about 3 inches of fabric margin around the board edge. Stitch spacing of roughly 0.5 inches keeps tension even across the entire piece.
The process runs in two passes: first across the horizontal axis, then down the vertical, with each pass laced through the other at the corners. This creates a grid of tension that holds the fabric flat for decades. Lacing works especially well for heirloom pieces or anything you plan to frame under glass.
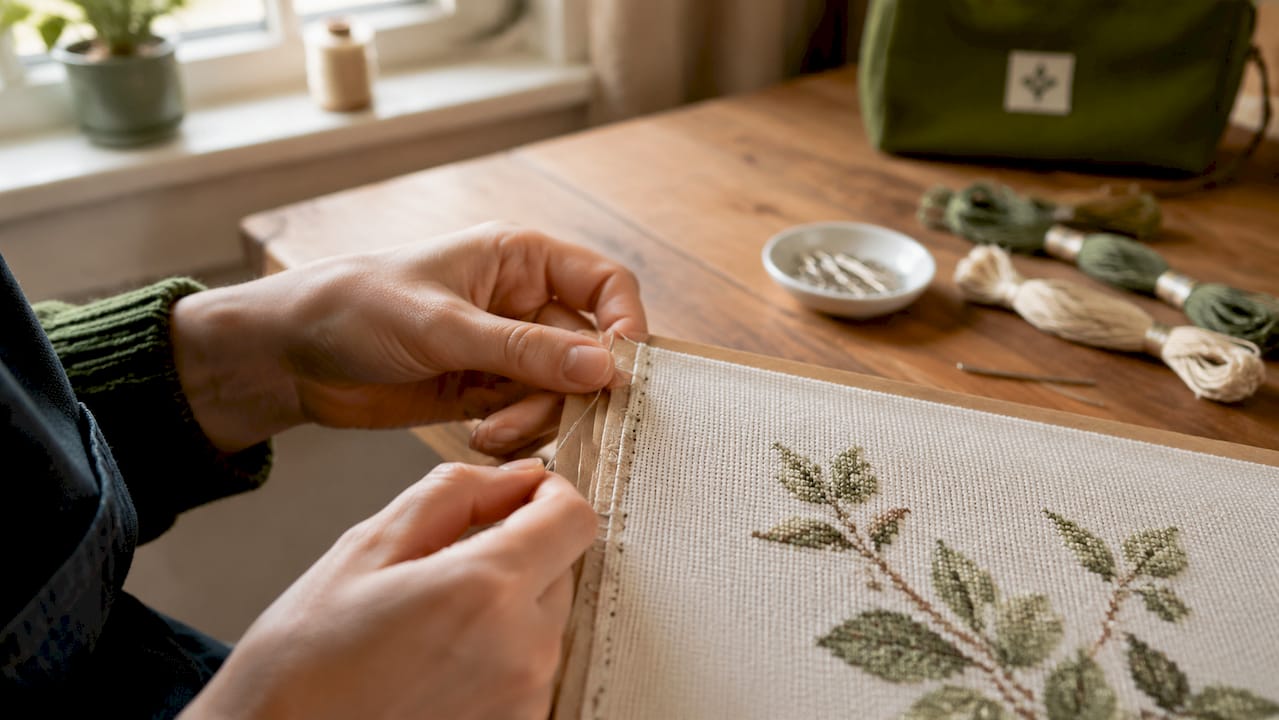
Pro Tip: Use rust-proof pins to hold the fabric in position while you lace. Standard household pins can leave rust stains on light-colored fabric if any moisture is present.
2. Choosing acid-free backing materials
Acid-free mount boards are the professional standard for preserving cross stitch over time. Regular cardboard contains acids that migrate into fabric and thread, causing yellowing and fiber breakdown within years. Acid-free boards stop that process entirely, which matters most for heirloom pieces or gifts meant to last generations.
Professional stitchers select acid-free materials for any project they intend to frame or store long-term. The cost difference between regular and acid-free board is small. The difference in longevity is significant.
3. Blocking for shape and dimension
Blocking reshapes and smooths fabric for presentation, and it’s a step many beginners skip entirely. The process involves dampening the finished piece lightly, pinning it to a clean flat surface with rust-proof pins, and allowing it to dry completely in the correct dimensions. This corrects any pulling or distortion that happened during stitching.
Blocking works on Aida, linen, and evenweave fabrics. Linen and evenweave respond especially well because they relax and reshape with moisture. Aida holds its grid structure more rigidly, but blocking still smooths out any puckering around dense stitch areas.
4. Pressing and ironing the right way
Pressing face-down on a towel is the correct method for ironing finished cross stitch. Lay the stitched piece face-down on a thick, clean towel, then press gently from the back with a warm iron. The towel acts as a cushion, letting the stitches sink into it rather than being flattened against a hard surface.
Beginners often iron directly on the stitched front, which permanently flattens the thread texture. That raised, dimensional quality is one of the most appealing features of cross stitch. Face-down pressing preserves it completely.
Pro Tip: Use a pressing cloth between the iron and the fabric back for extra protection, especially on hand-dyed or specialty fabrics that may react to direct heat.
5. Preventing and treating fabric fraying
Fabric fraying is one of the most common finishing problems, and the right solution depends on your fabric type. Aida cloth edges respond well to fray check liquid or masking tape applied before you even begin stitching. Evenweave and linen fabrics may need serging or pinked edges to stay tidy. Hand-dyed fabrics are the most delicate and benefit from carefully rolled and hand-sewn hems.
- Fray check liquid: Apply a thin line along the cut edge and let it dry before handling. Works best on Aida and standard evenweave.
- Masking tape or painter’s tape: A quick option for working fabric edges during the stitching phase. Remove before final finishing.
- Serged or overcast edges: The most durable option for linen and evenweave. Requires a sewing machine or serger.
- Folded and hemmed edges: Hand-sew a narrow hem for a clean, polished look on display pieces.
- Pinked edges: Pinking shears cut a zigzag edge that slows fraying on woven fabrics. A good no-sew option.
Choosing the right edge treatment early saves you from unraveling threads at the final stage. The right cross stitch fabric also plays a role, since tighter weaves fray less than loose ones.
6. Dimensional finishing with batting and felt
Adding batting or wool felt behind your stitched piece creates a padded, dimensional finish that works beautifully for ornaments, pillows, and framed pieces with a soft, cozy feel. Polyester wadding is typically 1–2mm thick to avoid unnatural bulges. Invisible hand-sewing secures the backing layers without visible stitches on the front.
This technique suits seasonal projects especially well. A Christmas ornament with a thin batting layer behind it looks full and professional rather than flat. The same approach works for small framed pieces where you want the stitching to appear slightly raised.
- Polyester batting: Lightweight, washable, and easy to cut to shape. Best for ornaments and small pillows.
- Wool felt backing: Adds warmth and a soft texture. Works well as a no-fray backing for ornaments and bookmarks.
- Fusible fleece: Iron-on backing that adds body without hand-sewing. Good for no-sew finishing projects.
- Decorative trims: Cording, lace, or pom-pom fringe sewn around the edge adds a finished, gift-ready look.
7. Creative finishing beyond traditional framing
Creative finishing options transform completed stitching into practical or decorative items that go far beyond a standard frame. Mounting on stretched canvas gives a gallery-style look with no glass required. Hanging rod methods use a dowel or decorative rod slipped through a fabric sleeve at the top for a relaxed, banner-style display.
Embroidery hoop framing is one of the easiest cross stitch framing ideas for beginners. Simply leave the finished piece in a decorative hoop, trim the excess fabric, and glue or stitch a felt circle to the back. The hoop becomes the frame. For quick gift projects, this method takes under 30 minutes to complete.
Other creative options include:
- Pillow finishing: Sew a backing fabric to the stitched piece, stuff with polyfill, and close the seam. Works for any square or rectangular design.
- Clothing embellishment: Stitch a small design onto waste canvas laid over a garment, then remove the canvas threads after stitching.
- Bookmarks: Finish with a felt backing and a tassel for a practical, personalized gift.
- Tote bag panels: Mount a stitched piece onto a plain canvas tote using fusible webbing for a no-sew finish.
- Seasonal ornaments: Cut into shapes, back with felt, and add a ribbon loop for hanging.
The best finishing method matches the project’s purpose. A piece meant for daily use needs a durable, washable finish. A display piece benefits from lacing and acid-free backing.
8. No-sew finishing options for beginners
No-sew finishing methods make it possible to complete a polished project without any sewing skills. Fusible webbing bonds fabric layers with heat, creating a firm, clean edge. Double-sided tape designed for fabric holds felt backings in place for lightweight ornaments and bookmarks. Iron-on hem tape creates neat folded edges on Aida without a single stitch.
These methods work best for small projects where structural strength is less critical. For anything larger than about 6 inches, hand-sewing or machine stitching gives a more reliable result. No-sew options are a great starting point, and many stitchers use them for quick gifts and seasonal decorations.
9. Finishing for display: framing and hanging options
Standard picture framing suits most cross stitch pieces and protects them behind glass. Use UV-protective glass to prevent thread fading from sunlight exposure. A mat board adds visual breathing room between the stitching and the frame edge, and it should also be acid-free to match the backing board.
For a more relaxed display, consider floral and decorative designs mounted in a simple float frame, where the fabric appears to hover against the backing. This style works especially well for pieces stitched on hand-dyed linen, where the fabric color is part of the visual appeal. Hanging sleeves sewn to the back allow display on a wall without any frame hardware at all.
Key Takeaways
The most effective cross stitch finishing starts with the right backing material, correct pressing technique, and a finishing method matched to the project’s purpose and display context.
| Point | Details |
|---|---|
| Lacing is the top mounting method | Use strong thread spaced 0.5 inches apart on an acid-free board for distortion-free results. |
| Acid-free materials preserve longevity | Acid-free boards prevent yellowing and fiber breakdown in framed or stored pieces. |
| Always press face-down on a towel | Ironing on the stitched front permanently flattens thread texture. |
| Match edge treatment to fabric type | Aida suits fray check; linen and evenweave need serging or hemmed edges. |
| Creative finishes expand your options | Hoops, pillows, ornaments, and canvas mounts all work without traditional framing. |
What I’ve learned about finishing after years of stitching
The finishing step is where most stitchers either lose confidence or rush through. I’ve done both, and the results showed it. The single biggest mistake I see is skipping the backing material decision entirely, treating it as an afterthought. Backing material is not decorative. It is structural. Choosing acid-free board from the start is a decision that protects years of work.
The second thing I’d tell any stitcher is to stop being afraid of lacing. It sounds complicated, but once you’ve done it once, you realize it’s just methodical thread work. The result is so much better than tape or glue that there’s no comparison. Your piece lies flat, stays flat, and looks professional for decades.
My honest opinion on creative finishing: the hoop method is underrated. Stitchers sometimes feel it looks “unfinished,” but a well-chosen hoop in the right size, with a clean felt back, looks intentional and modern. The Christmas Cardinal pattern from Simone Balman Art, for example, looks stunning finished in a simple wooden hoop with a red velvet ribbon. No frame required.
The one rule I never break: never iron on the front. Not once, not quickly, not “just to flatten one corner.” The texture you’ve built stitch by stitch is gone in seconds. Press from the back, always.
— Simone
Simone Balman Art resources for your next finished piece
Planning your finishing starts before the first stitch. Knowing your fabric dimensions, stitch count, and final display size helps you choose the right finishing method from the beginning.
The fabric size calculator at Simone Balman Art takes the guesswork out of fabric planning, so you always have the right margins for lacing or framing. The modern pattern shop features designs across flowers, animals, seasonal themes, and fantasy artwork, all charted with finishing in mind. Whether you’re planning a framed display piece or a dimensional ornament, you’ll find a design that fits your vision.
FAQ
What is the best way to finish cross stitch for long-term display?
Lacing onto an acid-free board is the most durable and preservation-conscious method for long-term display. It keeps fabric taut without adhesives and prevents the acid migration that causes yellowing over time.
How do I keep cross stitch fabric from fraying?
Apply fray check liquid to Aida edges, or use serged or hemmed edges on linen and evenweave. The right treatment depends on your fabric type, with hand-dyed fabrics needing the most careful handling.
Can I finish cross stitch without a frame?
Yes. Hoop framing, pillow finishing, ornament construction, and canvas mounting are all effective options that require no traditional picture frame. Many no-sew methods work well for small projects.
Should I iron my cross stitch before framing?
Press the piece face-down on a thick towel using a warm iron. Never press directly on the stitched front, as this permanently flattens the thread texture and reduces the visual depth of the finished piece.
What fabric works best for different finishing methods?
Aida cloth suits most beginner finishing methods including hoop framing and standard mounting. Linen and evenweave work best for lacing and professional framing because they block and press more smoothly than Aida.


