

Chain stitch embroidery is defined as a hand or machine technique where each stitch forms a small interlocked loop anchored into the next, creating a raised, textured trail with more visual weight than a running stitch and more flexibility than a satin stitch. The result looks exactly like a tiny chain lying on the surface of your fabric. Crafters use it for outlining, lettering, filling large areas, and decorative borders. It works beautifully on linen, cotton, and even denim. If you want a stitch that adds real texture and dimension to your projects, chain stitch is one of the most rewarding techniques you can learn.
What is chain stitch embroidery, and how is it made?
Chain stitch is built from a repeating loop motion. Each loop locks into the previous one, so the stitch literally chains itself across your fabric. The technique appears in embroidery traditions from India, China, and the Middle East, making it one of the oldest decorative stitches in textile history.
Materials you need to get started
Choosing the right tools makes a real difference in how your stitches look and feel. For needle selection, crewel or embroidery needles in sizes 5–9 work best. A size 7 or 8 is a great starting point for most projects. Use 2–3 strands of cotton floss for balanced detail and good visibility. If you want a heavier, more dramatic effect, all 6 strands create a bold, chunky chain. Standard stitch length runs 4–6 mm, which gives a clear, readable chain without looking loose or sloppy.
Step-by-step: how to do chain stitch
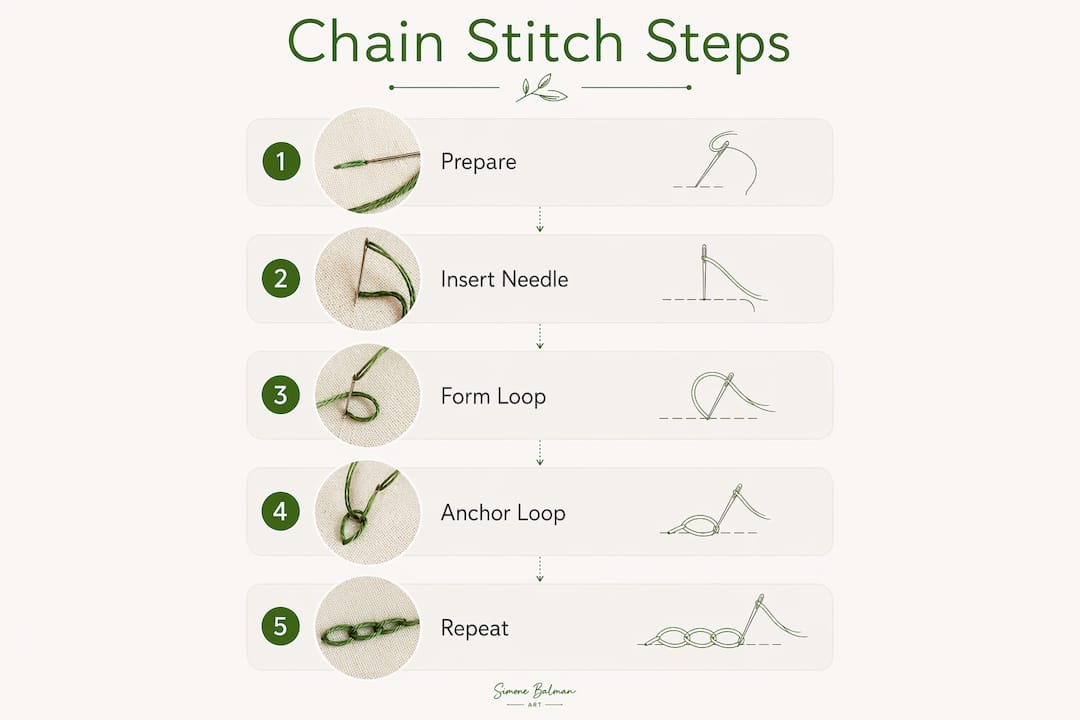
Follow these steps to build your first clean chain:
- Bring the needle up through the fabric at your starting point.
- Insert the needle back down very close to where it came up, almost in the same hole.
- Loop the thread under the needle tip before you pull through. This loop is what creates the chain link.
- Pull the needle through gently until the loop lies flat and rounded on the fabric surface.
- Repeat by inserting the needle inside the loop you just made, then forming the next loop under the needle.
- Finish the last stitch with a small straight stitch over the final loop to anchor it securely and prevent unraveling.
The forward chain stitch method is recommended for beginners because it produces clearer, more rounded loops and a more fluid overall line. Practice on a scrap of fabric before starting your actual project.
Pro Tip: Keep your loop slightly loose before pulling the needle through. Pulling too tight flattens the loop and kills the chain’s texture. Aim for a rounded, even link every time.
What are the popular chain stitch variations?
Once you feel comfortable with the basic stitch, variations open up a whole new world of texture and visual interest. Each one suits different project types and design goals.
- Cable chain stitch: An extra wrap creates a rope-like texture between each link, adding tiny knots for visual interest. Maintaining even wraps ensures consistent spacing. Use this for bold borders or statement lines.
- Whipped chain stitch: A second thread is woven through the completed chain without piercing the fabric. This thickens the line and adds color contrast. It works well for decorative lettering and floral stems.
- Detached chain stitch (lazy daisy): Each loop is anchored individually rather than connected to the next. This creates isolated petal or leaf shapes. It is perfect for flower centers, small leaves, and scattered motifs.
- Twisted chain stitch: The needle enters outside the previous loop at a slight angle, creating a twisted, braided appearance. Use it for textured borders and geometric patterns.
| Variation | Texture | Best use |
|---|---|---|
| Basic chain | Smooth, raised line | Outlining, lettering, fills |
| Cable chain | Rope-like, knotted | Bold borders, statement lines |
| Whipped chain | Thick, two-color line | Decorative lettering, stems |
| Detached chain | Isolated loops | Petals, leaves, scattered motifs |
| Twisted chain | Braided, angled | Textured borders, geometric work |
Pro Tip: Try the whipped chain stitch with a variegated floss for the secondary thread. The color shift creates a gradient effect that looks far more complex than it actually is.
How does chain stitch compare to other embroidery stitches?
Understanding where chain stitch fits among the basic embroidery stitches helps you choose the right tool for each design. Not every stitch suits every job.
Chain stitch excels at flowing, curvilinear designs, making it the preferred choice for vines, calligraphy, and organic shapes. That raised loop structure gives lines a three-dimensional quality that flat stitches simply cannot match. Backstitch and running stitch produce clean, flat lines, which work well for precise geometric outlines but lack visual weight. Satin stitch fills areas smoothly but lies completely flat against the fabric. Chain stitch fills areas with texture and lift, giving finished work a richer, more handcrafted look.
| Stitch | Texture | Difficulty | Best applications |
|---|---|---|---|
| Chain stitch | Raised, looped | Intermediate | Outlines, fills, lettering, vines |
| Backstitch | Flat, solid line | Beginner | Geometric outlines, text |
| Running stitch | Flat, dashed line | Beginner | Basting, simple outlines |
| Satin stitch | Flat, smooth fill | Intermediate | Solid color fills, leaves |
| Stem stitch | Slightly twisted line | Beginner | Stems, curved outlines |
Chain stitch requires consistent tension to avoid puckering, which makes it more demanding than backstitch or stem stitch. That said, the payoff is a stitch with genuine visual presence. For nature-inspired designs like botanical illustrations or ocean motifs, chain stitch delivers a texture that flat stitches cannot replicate. Cross-stitch, by contrast, builds designs from counted X-shaped stitches on an even-weave grid. It suits geometric and pictorial patterns but does not produce the flowing lines that chain stitch handles naturally.
What expert tips improve chain stitch quality and consistency?
Chain stitch exposes every hesitation or inconsistency because its raised loop structure puts every wobble right on the surface of your work. That is actually a good thing. It pushes you to develop disciplined, fluid hand-eye coordination faster than most other stitches.
These tips will help you build that consistency:
- Control tension with your non-dominant hand. Hold the working thread lightly against the fabric as you pull through. Keeping loops rounded rather than flattened or puckered depends more on this hand than on needle angle.
- Use a waste knot to start. Knot the thread and bring the needle down through the fabric a short distance from your start point, on the line you will stitch over. This anchors the thread without a bulky knot on the back.
- Reduce stitch length at corners. Shorten to about 2 mm when approaching a sharp turn, then return to your standard 4–6 mm length immediately after. Skipping this step produces rounded, distorted corners instead of crisp angles.
- Stitch with a rhythm. Fluid, consistent motion produces even loops. Stopping and starting mid-line creates visible inconsistencies in loop size and tension.
- Check the back of your work regularly. A messy back usually means tension problems on the front. Tidy thread management behind the fabric translates directly to cleaner stitches on top.
Pro Tip: If your loops keep flattening, try loosening your grip on the needle entirely and letting the thread settle before pulling through. Most tension problems come from pulling too fast, not from the wrong needle size.
Chain stitch is not just a beginner’s stitch. It is a sophisticated technique that expert embroiderers favor precisely because it demands precision. The learning curve is real, but every hour of practice shows up directly in the quality of your finished work. Choosing the right embroidery needle for your fabric weight also makes a measurable difference in how smoothly the loops form.
Key Takeaways
Chain stitch embroidery rewards consistent tension and rhythmic stitching, making it one of the most texturally rich and versatile techniques available to hand embroiderers.
| Point | Details |
|---|---|
| Core definition | Chain stitch creates interlocked loops that form a raised, textured line on fabric. |
| Essential materials | Use crewel needles size 5–9 and 2–3 strands of cotton floss for balanced results. |
| Stitch length matters | Standard length is 4–6 mm; reduce to 2 mm at corners for crisp, clean angles. |
| Tension is everything | Control loops with your non-dominant hand to prevent flattening or puckering. |
| Variations expand options | Cable, whipped, and detached chain stitches each suit different textures and project types. |
Why chain stitch changed how I think about embroidery
I came to chain stitch after years of working almost exclusively with cross-stitch. My first honest reaction was frustration. The loops kept flattening, my corners looked rounded and soft when I wanted them sharp, and I could not figure out why my lines looked uneven even when I was trying to be careful. What I eventually realized is that chain stitch does not forgive autopilot stitching. Every loop is visible. Every tension shift shows up. That is not a flaw in the stitch. That is the whole point.
Once I slowed down and started treating each loop as its own small decision, things clicked. The non-dominant hand became my most important tool. Holding the thread lightly, letting the loop settle before pulling through, and building a rhythm rather than rushing through a line made the difference between messy work and something I was genuinely proud of.
What I love most about chain stitch now is its range. I use it for lettering, for filling flower petals, for outlining botanical shapes, and for adding texture to areas where satin stitch would look too flat. If you are coming from cross-stitch or backstitch, give yourself a few practice sessions before judging the results. The stitch rewards patience more than almost any other technique I have worked with.
— Simone
Ready to put chain stitch into your next project?
At Simone Balman Art, you will find a growing collection of digital PDF patterns, printed pattern books, and free stitching tools designed to support crafters at every skill level.
Before you start your next piece, use the free fabric size calculator to plan your fabric requirements and avoid running short mid-project. If you want to scale a design up or down, the pattern size calculator takes the guesswork out of sizing. Browse the full collection at Simone Balman Art to find a pattern that inspires your next chain stitch or cross-stitch project.
FAQ
What is chain stitch embroidery used for?
Chain stitch is used for outlining, lettering, filling design areas, and creating decorative borders. Its raised, looped texture makes it especially well suited for flowing, organic shapes like vines, stems, and calligraphy.
How many strands of floss do I need for chain stitch?
Two to three strands of cotton floss work best for balanced detail and clear visibility. Using all six strands creates a heavier, more dramatic chain that suits bold decorative work.
Is chain stitch hard to learn?
Chain stitch has a moderate learning curve. The basic motion is straightforward, but consistent tension control takes practice. Beginners should start with the forward chain stitch method, which produces clearer, more rounded loops.
How do I keep chain stitch corners sharp?
Reduce your stitch length to about 2 mm when approaching a corner, then return to your standard 4–6 mm length immediately after the turn. This prevents the rounded, distorted corners that result from maintaining full stitch length through a sharp angle.
What is the difference between chain stitch and backstitch?
Chain stitch creates a raised, looped line with three-dimensional texture, while backstitch produces a flat, solid line. Chain stitch suits flowing and decorative work; backstitch suits precise geometric outlines and text.


